Showing posts with label horse riding. Show all posts

Monday, January 8, 2018

Riding One Handed in a Snaffle Bit


Suzanne wrote to ask about my friends, ".............. who are more experienced riders than me all ride one handed and tell me that I need to learn how to ride with one hand as opposed to two hands on the rein. I am using a snaffle bit and I am also told that I need to get a different bit so I can ride one handed. So my questions are where to go (what bit) from riding with two hands on a regular snaffle bit? By the way I use a loop reins and I really don't want to use separated reins. Thanks for any suggestions. Blessings, Suzanne." Linda and Abel also wrote in with much of the same question - where to go after a horse moves well off a direct rein.

That's a good question Suzanne. While the snaffle bit is really designed to be ridden with two hands I would not necessarily say that you can't ride one handed in this and depending on what you are doing, say trail riding, you may even now be riding one handed some or most of the time. In fact, it's going to be necessary to ride one handed in a snaffle bit at times when you need your other hand free such as opening a gate, scratching your ear, pulling your hat down on your head, and checking your phone as everyone seems to be doing these days. Another reason to be able to ride one handed, which became apparent to me recently, is that you may have an injured arm. After I started this reply, I was helping brand cattle and we had a mechanical problem with the squeeze chute which required a partial disassembly to release the over 1,000 pound bred back Red Angus momma. A miscommunication between me (out in front of the chute, heading to a gate to get a tool) and the person operating the squeeze chute led to the release of the side panel. She had been in the chute for 20 minutes and was mad as hell (which, let me assure you, is an understatement). When she cleared the chute, I was the nearest target. Getting repeatedly slammed into the corner of a pen, bruised me up on the ribs and back some, but re-aggravated an old injury to my left arm and elbow, which made riding one handed in a hackamore necessary the next few days.  Sure glad my hackamore horse work okay on neck reins and leg cues.   

I have heard the perception that riding with two hands is for beginners (in fact some people derisively call it plow reining) and riding one handed shows a more experienced, capable rider, but this is simply not true. It's how you use your hands, not the fact that you are using both of them. In fact, if you are roping a calf and tying off, the thought may cross your mind that it would be nice to have three hands.

Even with one piece loop reins and a snaffle bit, you can get your horse to neck rein. The bit becomes much less to do with neck reining as the horse learns to turn his head and neck from the pressure or weight of the rein on his neck. Horse hair reins, which have a prickly feeling so the horse can learn that feel early on in neck reining training, are traditionally used. But your leather or rope reins will work. I ride in a parachute cord mecate which is like what you are calling loop reins - others call them roper reins. The mecate is a continuous rein, normally 22 feet in length although I have used slightly shorter one. The mecate reins begin on the right side of the snaffle bit, usually connected to the bit by a slobber strap, then looping over the horse's neck then running through the left side of the snaffle bit or bosal (again through a slobber strap) and using the excess portion of the mecate to be a lead rope that can be tied to the saddle or tucked into your belt for a quick release, giving the rider a lead rope when they dismount. You can see the slobber strap and how a mecate is rigged in the photos below.

Some rider's don't want the excess rope of the mecate so an 8 or 9 foot loop or roping rein is attached via slobber straps to the snaffle bit. Works the same for the rider, you just don't have a lead rope if you dismount nor the excess rope to worry about.

Anyway, you can ride with a direct rein one handed in the snaffle bit or bosal. The thing to watch out for is not to activate or make the in-active rein taunt otherwise the horse will perceive conflicting signals. This would be evident as the horse slows his momentum or stops and his head normally comes up seeking a release from the pressure. Once you are comfortable manipulating the reins with one hand to use a direct rein, you can start getting him sacked out on neck reining.


Most horses can understand the ask of neck reining within short order and get functional at it quickly. The place to start is to place the rein on his neck (it has to be loose and not in contact with his mouth or nose if you are riding in a bosal), then ask for a change of direction, a tip of his head with the direct rein. In  Figure 1 above I am placing the outside rein (the rein opposite of the direction you are turning) on the neck. Again the rein is slack enough so it doesn't pull on the snaffle bit. If I think it will help a horse, I'll actually have my fingers pushing the rein on the neck.


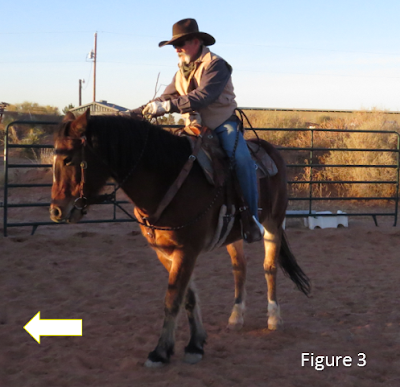
In figure 2, I am exaggerating a direct rein in the direction I want to turn. You can see the horse's left front foot moved a little to the right feeling the neck rein. In Figure 3 below, the horse stepped to the inside with his right front and the photo shows the left front stepping across. At this point in introducing neck reining, I am not using any leg pressure or cues. So again the sequence is the neck rein, then direct rein. Be sure to release both when the horse shows some understanding (a weight transfer or better yet a step to the inside - the direction you want to turn). Give him a pause, then build on that.


In the beginning, don't be too concerned about having your hand with the neck rein across the horse's neck - but do be watchful that you are not using the neck rein to pull the head over because it will unbalance you to some degree, and if you do this, you will likely make that neck rein taunt and give the horse a confusing signal. So you are likely going to exaggerate to make the signal clear, then you can refine your signals as you go.

Once you and your horse are good with this, both standing still and at the walk and trot, then you can add a leg cue to re-enforce the neck rein. You will find that it will increase the promptness or sharpness of the turn of direction. You need to be able to control your horse's front end, barrel and back end with your legs anyway, so this will be a tool you will practically always use. Use your outside leg - the same leg as the neck rein - to apply pressure with your calf or toe to the horse's barrel at the front cinch or just forward of that, ....just like you would if you were asking your horse to move his front end over, or continuously moving his front end over for a turn on the hocks.

Now you should be able to start using the reins one handed with the neck rein and the leg cue in support, to move him in the opposite direction.

I ride two handed with a loop in the reins held by one hand (in my left hand in Figure 4 below), and the other hand holding the rein on the other side. If I want to switch to one hand, I bring one hand to the other transferring control of both sides of the rein to one hand (see the arrow in Figure 4) and dropping the loop. Then I have control of the reins in a single hand (Figure 5).


Many of the best horseman will ride mecate reins one handed always with a loop in the reins to hold the excess. I'm not one of them, so I pretty much have to hold the reins one handed, as described and shown above, to keep myself out of trouble. Just by sitting on the horse and not moving, you can manipulate the reins back and forth, figuring out what works for you, and getting handy at it. So really, my advice is just get on your horse, practice manipulating the reins and transferring control from two hands to one hand and back; then experiment with a neck rein - remember the neck rein then direct direct in that order - exaggerate in the beginning and reward the slightest understanding shown by the horse with a release and pause; progress next by using the outside leg with the neck rein; then I think you'll b able to ride on handed using the neck rein and leg cue to turn your horse.

If you plan on working gates, it will pay off to be able to use a leg cue to move the horse's back end, disengaging the back end.  You are likely doing this now.  Controlling all parts of the horse, and being able to do that one step at a time will help you position up on a gate and be safe about it.  And lastly, before anyone leaves a comment about it below - I don't think I'm as fat as the photo tends to relate, but then again I sure do like my ice cream.  Good luck, safe journey.   


Thursday, December 14, 2017

Arena Patterns: Ground Poles and Box


This is another easy pattern or obstacle for your arena, consisting of ground poles and a box, that everyone can use and use in multiple ways so you and your horse and can get a lot out it. While it can just be used as ground poles to go over and over with your horse to help him learn to pick his feet up, and to help you with the timing of the feet, it can also be used for turns, backing, side passing and tight turn arounds with forward momentum, which judging from the Arena Obstacle Challenges I run each year, seem to be a problem area for many horses and riders.

I had a client in my arena riding a horse who was half draft horse - pretty tall maybe 17 hands, but short backed actually. The pair had a problem with turning tight circles. We weren't going to get everything solved that day, but after working on lateral and vertical flexion, and controlling the head/neck, front end, barrel and back end - which I advocated doing everytime that horse was pulled to ride, we moved onto the drills you see in the diagrams below. As I demonstrated the many various things you can do with ground poles, the client said words to the effect that she "would have never thought about doing anything but riding over the ground poles like cavalettis, like in Figure 1 below.

Figure 1. Riding over the ground poles really helps the horse pick his feet up. The change of interval from the first five poles to the last ground pole on the far side of the circle adds a challenge in concentration. I think this exercise also puts a reason into asking the horse to get soft, drop his nose vertical, as it helps him see the ground poles.  You can also change up the interval from pole to pole.

  
Figure 2. This is pretty much the same exercise as Figure 1 but adds a small circle under forward momentum in the box. I have my box with 6 foot long sides, but if you have a really large horse you can extend the box somewhat. I do that for big horses competing in Arena Obstacle Challenges. The idea is to do this circle smoothly without it looking like a narrow turn on the hocks, then a step forward, then another narrow turn on the hocks. It helps if the horse is soft and can follow his nose keeping the bend without fading out - which requires forward momentum. The follow on to the circle in the box is to do the circle using only a neck rein and once you can do that, do it using only leg cues and pressure.
Figure 3. This exercise is riding between the ground poles, doing a turn around after you get through the poles in order to get lined up and go through the next set.  The basic idea is to do a 180 degree turn with forward momentum.  You can turn on the front end or on the hocks which will likely require re-lining up a bit to proceed forward through the next ground poles.  After four trips between the ground poles, you enter the box and execute a 360 degree turn with forward momentum.
Figure 4. This is pretty challenging - riding forward between two poles, side passing to get lined up for the next set, then backing up. Repeating this until you can side pass over then step into the box for a tight circle.
While you could ride over this pattern and these obstacles for a while before ever doing the same thing, if you change up the way you enter the poles, or doing it in reverse, I would consider sticking to a particular pattern until you horse gets comfortable with it and improves quite a bit before you change it up.  You can also side pass over the poles - in fact, another way I use ground poles is to trot over them and stop my horse so he has his front feet on one side of a ground pole and the rear feet on the other side of the pole, then side pass him one direction or the other.    

You are only limited by your imagination and what's safe for you and your horse to perform.  One more variation is that once inside the box, position up and do turns on the hocks or on the front end rather than doing a circle.           

Tuesday, April 21, 2015

Small Saddle Bag - Sanctuary Leather


Large conventional saddle bags are sometimes too big and bulky for recreational trail riders or endurance riders. And for some people, I imagine that routing the saddle strings through the saddle bags to hold it to the saddle in back of the cantle is time consuming.    I have also seen many show type saddles being used for trail events and competitions that do not have saddle string.  saddles.  But I have seen rider's with cell phone pouches on their saddles and also riders with a small horn bag for carrying a water bottle, human and horse snacks, and other incidentals.

Never a big fan of nylon tack, I asked a maker in San Antonio, Texas to build some small saddle pouches that I can use as gift's or awards in competitions I will run later in the year. Dennis Holloway, a disabled vet, owns and operates Sanctuary Leather making everything from handgun holsters, to knife sheaths, belts and a wide selection of small leather items.


I contacted Dennis and we went back and forth on some designs and led to a delivery of four mall  saddle pouches.  I asked him for saddle string slots at the top, so I can choose which one's to secure using saddle strings and which pouches to install a slotted concho and snap on the back to attach to either D rings for rigging or to the small D rings that sometimes are placed underneath the conchos.

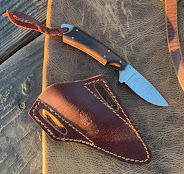
The picture at top left is one of the small saddle/medicine pouches with a slotted concho and a saddle string holding a snap to attach it to a small D ring on the back of the saddle.    

If you are looking for a saddle pouch like this, or anything else, Dennis' turn-around time is pretty dog gone short and his prices are more than fair.

For the saddle pouches in the picture at rights, with your choice of a dark, medium or natural finish, Dennis charges around $45. He can also do carving and stamping as well.

 The saddle bags in the picture at right are 6 inches long, 5 inches wide and 2.5 inches deep.


Monday, November 4, 2013

Body Position Riding Down Hill


Dan wrote to me and asked "What is the proper seat position when riding down a steep hill? I have read 'lean back', 'lean forward', etc. (I) want to make it easiest and most comfortable for my horse".

Thanks for writing Dan and you're good to be thinking about your horse. While I may not know about "proper" seat position, I'll give you my opinion and some photos, sorry I couldn't give you a bigger or steeper hill right away, but the principles are the same.  Those mountains in the background are 20 miles away. 

I have to have an idea that the hill is safe before starting down it. I've been down some pretty steep and rocky slopes with Cholla cactus everywhere, hoping we get through it unscathed and holding my breath each time my horse's feet started sliding or the ground was giving way.


Its good to get your horse used to stopping on the top of the slope and allowing him to drop his head so he can take a gander at the hill you're about to ask him to go down. See photo at left.  As far as going downhill straight away or going downhill in a zig zag pattern - it would depend upon the steepness, presence of a path (or not) and obstacles along the way.

Hills can scare some riders, and some will make the mistake to take up slack in the reins or pull on their horse. This can pull your horse's head up, get him out of position,....cause him to be bracy and not allow him to see the ground like he should - nothing good comes from this.


You and your horse will have more control coming downhill if the horse can break at the poll and collect, bringing his hind end more up and underneath himself. This is hard to do, but it starts with the horse being soft. As you start downhill the horse needs a fairly loose rein, but you need to be able to rate him so it doesn’t become a run downhill.

I use a lot of small hills like in the pictures to get my horses used to stopping at the stop and walking down. And sometimes at the bottom, if it isn't too steep, I'll ask him to take a couple steps backwards.

I would suggest that leaning forward is not good. Puts too much weight on your horse's front end and making it likely that you come over his head if he stumbles. My body position going downhill is to lean back keeping my body relative to the sky as I am when I am riding on flat level ground. You'll end up putting a little weight in the stirrups with your heels down. Some riders may straighten their legs and some like me will like just a little bend in their knees.

Most of my saddles have a pencil roll on the cantle, so there is nothing really to grab onto, although sometimes I'll use my free hand to brace against the saddle horn. But if you are riding a saddle with a Cheyenne roll, it will provide a ledge which you can grab with your free hand by reaching behnd yourself - try not to twist your torso much. This would also come in handy keeping you from being propelled forward if your horse stumbled or his front end buckled.

I guess I could have just said "Don't Lean Forward, instead Lean Back" but nobody ever accused me of using a six words when I can use a hundred.  I'll try and get up into the foothills in the next couple of weeks for better photos or a video, until then I hope this helps Dan. Safe Journey.