Wednesday, November 25, 2015

Fit and Placement of the Bosal


I received an e-mail from Abrahim who asked about fitting a Bosal. " Dear Sir, I am wondering if you could give me some information when using a Hackamore on a horse how the nose band should be (placed) and is it supposed to be a tight fit. "

That's a great question Abrahim, but I'm going to address it as 1 - fit of the nose band (Bosal) and 2 - placement of the Bosal, as I think it's two different things. For instance on fit, the Bosal has to have some movement in it, but not much. If you have a Bosal that is only making contact on the top of the horse's nose with Bosal's nose buttons, then all the weight and pressure of that Bosal is impacting at this location.

Consider a Bosal that forms to the horse's nose and upper jaw - this is likely more comfortable for the horse to carry.  This is going to be more oval shaped than round shaped.

Most of the movement of the Bosal is between the horse's jaw and the heel knot where your mecate is tied to. You should have 2 or 3 fingers width here so that the Bosal heel knot can move backwards then drop forward back into place when released.  The picture at left shows two fingers of space between the heel knot and tied on mecate when the Bosal is in a relaxed or forward position.  One less wrap of the mecate or an extra wrap of the mecate above the heel knot can add to or reduce this space.


And placement is important, as if you have the Bosal too low on the nose it can hurt the softer nose cartilage just ahead of the nostrils. A rough placement for the Bosal is to look for the horse's nose bone as it starts to taper towards the nostrils. Find where the nose bone is not longer visible and place the Bosal up a couple, maybe three, finger widths to start. I'd be concerned with fitting the Bosal lower than this.  The picture at left shows two finger widths above the spot where the nose bone tapers to a "V". 


The Bosal's fit, or what you are asking about as "tightness", is that the nose band portion of the Bosal's nose button puts pressure on nerves on the top and sides of the horse's nose. The Bosal should not have to be "opened" or pulled apart as it is placed onto the horse. This would be in effect squeezing the nose.

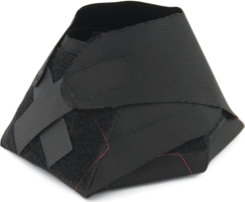
The Bosal can't be round or loose, or otherwise have a sloppy fit on the horse's nose either. A loose fitting Bosal will put too much pressure on the top of the nose and make signaling harder for lateral work.  The picture at right shows a pretty decent fit as I just slide the bosal onto the horse's nose.  I was scratching Junior behind his ear so he would stand still for a photo. 

I use a block to shape a Bosal, see the picture at right. I'll coat the rawhide Bosal with Rawhide cream then tie the Bosal around the shaping block. You can buy Bosal shaping blocks from various makers, or you can make your own custom block to shape a Bosal for the intended horse. Most quality Bosals come shaped pretty well. They should be oval shaped as opposed to round. Again, I recommend shaping the Bosal to the horse you are going to use it on.  The Bosal being shaped at right is for a horse with a wider nose.     

I think it may be a good idea if you ride often with a Bosal to use several different correctly fitting Bosals. What some people refer to as a "loping Hackamore", which is a braided soft rope Bosal, could be used to change up the feel for the horse, give him a break, and ensure you are not consistently putting pressure on the same spot.

The diamater of the Bosal will have something to do with the amount if pressure you are placing on the nose. Generally, without regard to the material or roughness of the Bosal, the thinner a Bosal is the more pressure it can exert. However, a heavy or weighty, thicker Bosal can also put pressure on the horse's nose just when he carries it.

Some people may be tempted to believe that since you have nothing in the horse's mouth, it will be hard to hurt him riding with a Bosal. This is not true. An ill fitting Bosal, with play at the sides (side buttons) will sore up a horse's nose pretty quick.  A improperly placed Bosal, where it is too low on the horse's nose can damage the horse's nose.  I would also suggest inspecting your Horse's nose visibly and with your fingers to check for soreness.  And I imagine with harsh used buildup on the nose bone could occur.

A Bosal that is not taken care off, such as being dried out or having some of the rawhide braids gets loose and warped, can also sore up a horse's nose. Granted, some rawhide cream on a quality Bosal will keep this from happening and I have only seen rawhide strands warp or turn on cheap Bosals.  I have bought most of my Bosal's from Big Bend Saddlery or Craig Cameron's Double Horn Store.  I still run my finger around the Bosal, especially the inside that makes contact with the horse, from time to time to check for roughness.  

And lastly, quick and heavy hands can make any Bosal, or bit, or even a halter into an abusive tool.

I'm sorry Abrahim if you got more of an answer than you sought, but like my wife will tell you, I don't use 8 words when I can use 30. 

Tuesday, November 17, 2015

Natural Feeding For Horses


I was recently asked by U.K. based author and consultant, Alexandra Wesker, MSc, to review her new book "Natural Feeding For Horses - Discover Roughage Based Feeding for the Physical and Emotional Health of Your Horse".

Ms. Wesker writes that she had a hard time as a Equine Nutritional Consultant in finding a book to recommend to her clients, so she decided to write the book she was looking for. The result? A thoughtful, well researched and written book that will make a positive impact on horses as it makes it's way into the hands of horse owners. This book can be used by new horse owners who just want a basic understanding of horses, digestion and feeds, as well as the old experienced hands who want to delve into formulas for developing a feeding program based on their horse's size, breed, activity level, and considering the digestible energy and nutritional vales of feeds.

What is Natural Feeding? In a nutshell, it's feeding a roughage (hay) based diet and feeding in a manner like nature, including horse's eating off ground level. Alexandra addresses this in detail and why this is very important. Like many people, I have used several different types of feeders and was happy to find large plastic milk crate type boxes so I could feed my horses at ground level, which is how they are designed to eat, as well as keep the feed off the ground to minimize the ingestion of sand.

But this book is more than that. I liked the section of the book discussing various grasses such as Orchard, Timothy, Bermuda, the various Fescues, Brome, Blue Grass, Ryegrass and others, and the charts on the nutritional value of hays.

Others will appreciate the Suggested Diets chapter. Ms. Wesker follows up with many examples of horses, their breed and activity, and feeding examples. So, if you have ever been confused about determining the digestible energy content of the feed you provide your horses, or what level your horse needs based on it's activity and size, then this book and it's easy to understand formulas will help as she walks the reader through determining activity levels, required feed level, designing feeding programs, and information on safely replacing feeds with cereals.  She advocates about consistency in the feeding program and the necessity of making changes gradually.

The last thing I would like to say if that Alexandra recognizes the emotional or mental health aspect of horses and advocates horses being able to move, obtain overhead cover and not be kept in solitary conditions - which I appreciate as I see way too many horses who are viewed and treated as tools or objects and not living, thinking and feeling creatures. Stabling a horse, by itself, in a small stall, no matter how good your feeding program is, is akin to mental/emotional abuse. Those conditions alone are likely to cause behavior and digestive problems. It is my wish that all horses could be given a fair deal by their owners and a continuing education in horses and their care is the road towards that.

Buy the book, you won't regret it.   You can also check out Alexandra's website: Natural Feeding For Horses.

You can order a copy of Natural Feeding for Horses through Amazon.com

Wednesday, November 11, 2015

Tack Tip - Crusty Cinch Latigos


Here's a short tack tip on storing your cinch latigos (cinch straps) so they remain more pliable. Of course, we should be cleaning and treating our saddles and tack. But sometimes we (or maybe just me) are neglectful of our tack or the environmental conditions just get ahead of us.

I usually use a diluted mix of household dish detergent and a rag to clean my saddles and gear. Sometimes I'll need to use a dish brush on my gear as well to get the sand and dust out of the crevices.  Don't tell my wife I use dish brushes - I've been blaming the dog when dish brushes disappear from the sink.

Then I apply 100% Neat's Foot Oil to all the leather. On my latigos, this will keep them all soft and pliable.  But I also use this technique in the photos below to secure cinch straps, both on saddles I routinely use and those I have stored for longer periods of time.

Careful as you might be, sometimes the latigo drags in the dirt and combined with salt from the horse sweating, a cinch latigo may get stiff and crusty. So for the last 15 years or so, I have been in the habit of tying up most of my latigos in the manner shown below. It pretty much works to keep the latigo flexible and easy to weave though the cinch D ring and saddle D ring.


In the photos above:  Step one - I loop the latigo through the D ring twice, like you would to situate the latigo for easy pulling out and running through the cinch D ring.  Step 2 and Step 3 - I wrap the running end of the latigo around section looped through the D ring, and Step 4 - I stick the end of the latigo through the bottom.


This helps keep the latigo from getting loose and catching on something, or dragging in the dirt, and the whole process of bending and wrapping the latigo helps debris fall away from it, and keeps it pliable.  This is also a good way to store a  cinch strap on a saddle that may be put up for a while.  


Tuesday, November 3, 2015

Horse Pulls Lead through Tie Ring


Bob wrote me about using my Functional Tie Ring. "I bought one of your tie rings and I like it. My horse who has broke two halter lead snaps in the past, tried to pull back once and got a slow release like you said. However, now he pulls back slowly and pulls the lead through the tie ring. How do I train him not to do this?"

Thanks for buying one of the Functional Tie Rings, Bob. I'm glad it worked for you getting your horse to understand he doesn't need to pull back to get a release. They often have to do something once in order to figure out that they didn't need to do it in the first place - that's the whole deal behind tie rings that give a slower friction enhanced release when horses pull back.

You are not going to be able to train your horse not to pull back gradually and pull the lead through the tie ring.  He's just intelligent enough to have figured it out.  What you can do is to make it more difficult for him to do so. 

When horse's pull back from being hard tied, the pressure of the halter strap, or rope on a rope halter, across their poll (behind the ears) generates a lot of pressure which causes the horse to panic and pull back harder usually breaking the snap on a lead rope. Once a horse pulls back on a lead that is looped through a tie ring and gets a release, albeit slowed because of the friction of the lead rope running through the tie ring, he usually figures out that he doesn't have to pull back, but occasionally a horse learns he can pull slowly and run that lead all the way through the tie ring.  I marvel at their ability to figure out things like this and opening gate latches, etc. 

I had a horse tied to a Functional Tie Ring using a extra long lead line, maybe 18 feet long, and he pulled slowly and continued pulling slowly while turning on his back end and the result was that he wrapped that extra long lead line around his body a few times.  When I saw him all wrapped up but standing still, I wasn't put out my mistake so much as I was happy he just stood there.  It was a good thing that I had sacked him out on ropes across the legs and haunches.

So now I routinely take the running end of the lead line and wrap it a couple of times around the lead rope from the tie ring to the halter, if I am walking away from the horse for any significant amount of time out of my ability to see him. This adds friction to the release. That friction can be a little or a lot based on the type and diameter of lead rope you are using and how many times you wrap it. I generally wrap the running end twice using 1/2 inch yacht braid lead ropes, if I'm going to be bout of sight of a tied horse for a bit. 


   In the pictures above, at left, is a lead rope looped correctly through the Functional Tie Ring - the running end is on the left and the right end of the lead rope is tied to the horse's halter. If the horse pulls back, he'll get a nice release based on the friction of the rope sliding through the tie ring.   In the picture above at right, the running end of the lead rope has been looped around the horse end twice to create that greater or harder friction if the horse pulled back. In both pictures the excess running end of the lead rope is just looped over a rounded hook on the trailer - it just keeps it off the ground.  Hope this helps Bob.  Safe Journey.